
How to Change a Tire (Beginner-Friendly Guide)
Last updated on April 9th, 2026
You’re driving and suddenly feel the car wobble… you pull over and realize you’ve got a flat tire. At that moment, it’s normal to feel stressed, confused, or even a little stuck about what to do next.
The good news is—you don’t need to be a mechanic to handle this. Learning how to change a tire is a simple skill that anyone can pick up with a bit of guidance and patience.
In this guide, you’ll learn everything step by step in a clear and easy way. We’ll walk through the full process, important safety tips to keep you protected, and the most common mistakes people make so you can avoid them.
By the end, you’ll feel more confident and prepared the next time you face a flat tire on the road.
Tools You’ll Need For Changing a Tire (Before You Start)
Before you begin, take a minute to gather a few basic tools. Most cars already have what you need, but it helps to know where everything is and how it works.
Essential tools
You’ll need a spare tire, a jack, and a lug wrench.
The spare tire is your replacement wheel. It’s usually stored in the trunk, often under the floor panel. In some cars, it’s mounted underneath the rear of the vehicle. Keep in mind, spare tires are sometimes smaller than regular tires, so they’re only meant for short trips.
The jack is what lifts your car off the ground. You’ll usually find it in the trunk, near the spare tire. It can feel a bit tricky the first time you use it, but once you see how it moves, it makes sense.
The lug wrench is used to loosen and tighten the bolts (lug nuts) on the wheel. It’s often stored with the jack. Some are simple cross-shaped tools, while others are just a single bar. Either one works fine, though smaller ones can require a bit more effort.
Helpful extras
These aren’t required, but they can make the job easier and safer—especially if you’re on the side of the road.
- A flashlight helps a lot at night or in low light
- Gloves keep your hands clean and give you a better grip
- Wheel wedges or even a couple of bricks can stop the car from rolling
- A reflective warning triangle makes you more visible to other drivers
Most of these items aren’t included with your car, so it’s worth keeping them in your trunk if you can. You don’t think about them until you really need them.
Safety First When Changing a Tire
Before you touch the tire, make sure the car is in a safe place. This part matters more than the tools. A flat tire is stressful enough without adding traffic or a car that moves unexpectedly.
The two biggest risks are passing traffic and the car slipping while it is lifted. Even a small mistake can turn a simple tire change into a dangerous situation.
Here is what to do first:
- Pull over to a flat, stable surface if you can.
- Turn on your hazard lights right away.
- Put the parking brake on.
- Place a warning triangle behind the car so other drivers can see you.
A flat, level area gives the jack a better base. If the ground is soft, sloped, or uneven, the car can shift or tip more easily. That is why it is worth taking a few extra seconds to find a better spot.
Hazard lights help other drivers notice you sooner, especially at night or in bad weather. The warning triangle adds another layer of visibility, but it is not a perfect shield. If the road is busy or the shoulder feels unsafe, stay away from traffic as much as you can.
The parking brake should always be on before you start. It helps keep the car from rolling while you work. That small step can make a big difference.
Take safety seriously before anything else. Once the car is secure and visible, the rest of the job is much easier and much safer.
How to Change a Tire: Step-by-Step Guide
Changing a tire is mostly about staying calm and taking one step at a time. Do not rush it. A slow, careful approach is safer and usually easier.
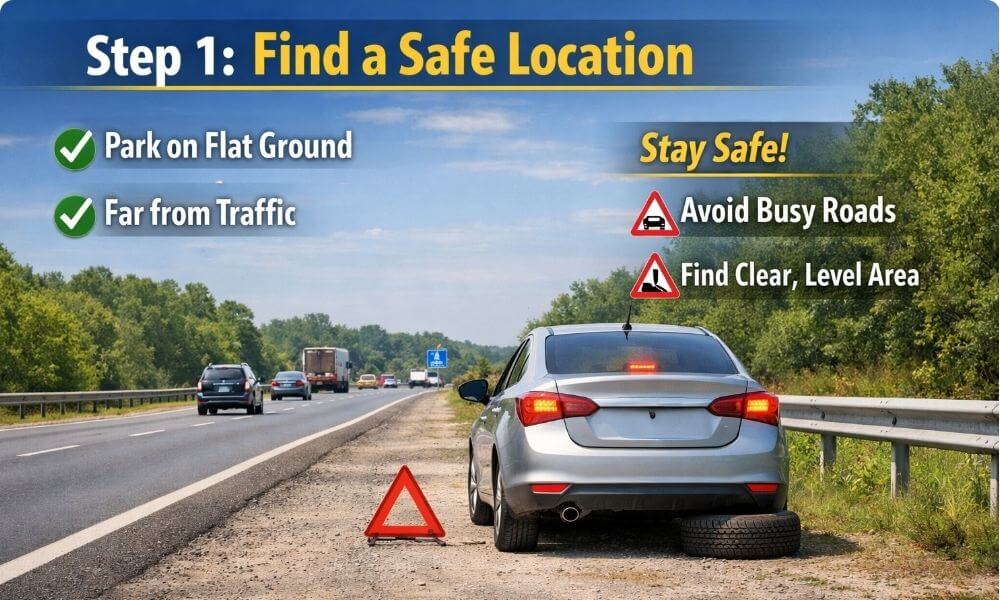
Step 1: Find a Safe Location
As soon as you notice the flat tire, slow down and look for a safe place to stop. Do not brake suddenly or stop in the middle of traffic if you can avoid it.
Try to move your car away from busy lanes. A wide roadside shoulder, a parking area, or a quiet street is much safer than staying close to passing vehicles.
Look for flat ground. This makes the next steps easier and more stable. If the road is sloped or uneven, the car can shift slightly, which makes the job harder and less safe.
It might take an extra minute to find a better spot, and that’s okay. Stopping in the right place makes everything that follows much simpler.
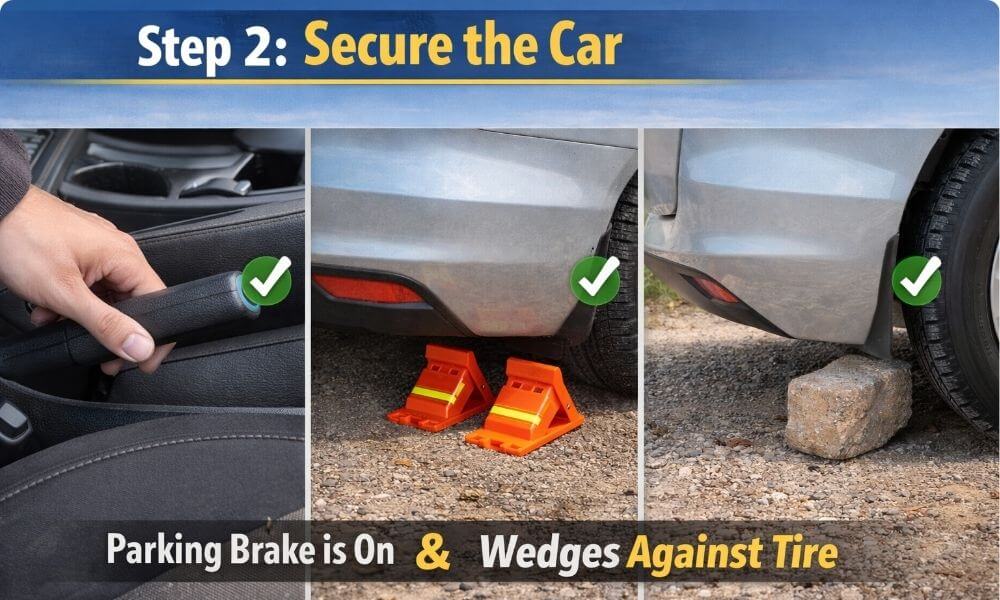
Step 2: Apply Parking Brake & Secure the Car
Once the car is stopped, set the parking brake right away. This helps keep the car from rolling while you work.
Even a small movement can be a problem when the car is lifted. The parking brake reduces that risk and keeps things steady.
If you have wheel wedges, place them against the tires that will stay on the ground. If not, bricks or large stones can work in the same way.
It may feel like an extra step, but it gives you more control. On slightly uneven ground, this small effort can make a big difference.
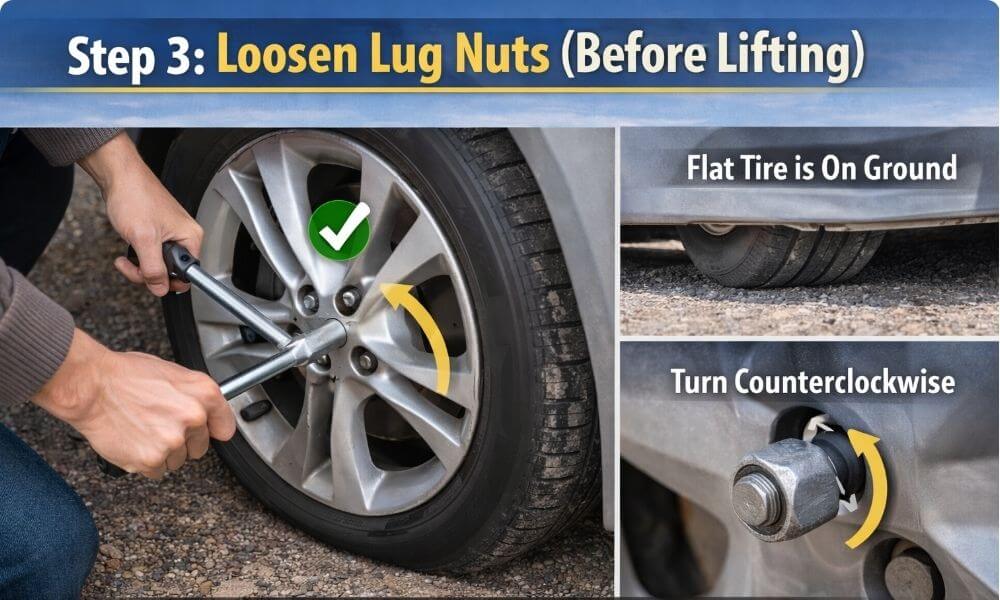
Step 3: Loosen the Lug Nuts (Before Lifting)
Before lifting the car, use the lug wrench to loosen the lug nuts on the flat tire. Turn them counterclockwise. At this stage, you are only loosening them, not taking them off.
This step is much easier while the tire is still on the ground. The wheel stays in place, so you don’t have to fight against it spinning.
Some lug nuts can be very tight, especially if they haven’t been removed in a long time. If that happens, place the wrench securely on the nut and press down using your body weight. That usually gives you enough force to loosen it.
Take your time here. If the wrench slips, adjust your grip and try again. A steady push works better than quick, forceful movements.
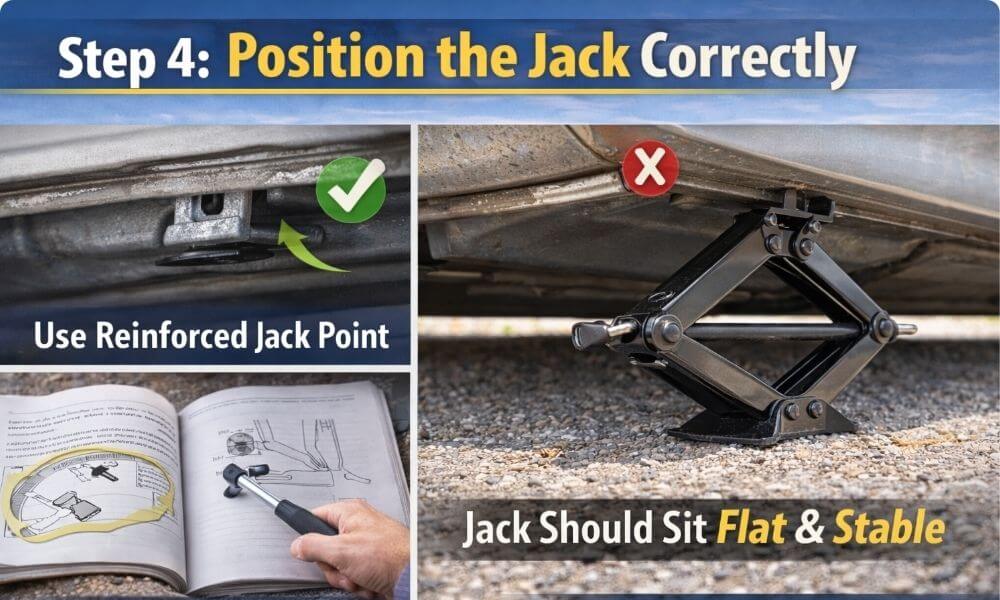
Step 4: Position the Jack Correctly
Now you need to place the jack under the car, but this part has to be done carefully. The jack cannot go anywhere you like. It must go on a strong metal spot called a jack point.
Jack points are small reinforced areas built into the car. They are designed to hold the weight of the vehicle safely while it is lifted. If you place the jack in the wrong spot, you can damage the car or make it unsafe to lift.
Most cars have jack points just behind the front wheels or just in front of the rear wheels. You will usually see a small notch, mark, or thick metal section along the bottom edge of the car.
If you are not sure, check the car manual. It will clearly show where the jack should go. This step is worth double-checking because guessing here can cause problems.
Once you find the correct spot, slide the jack under it and make sure it is sitting flat and stable. Do not rush this part. A correct position makes the lifting process much safer and smoother.
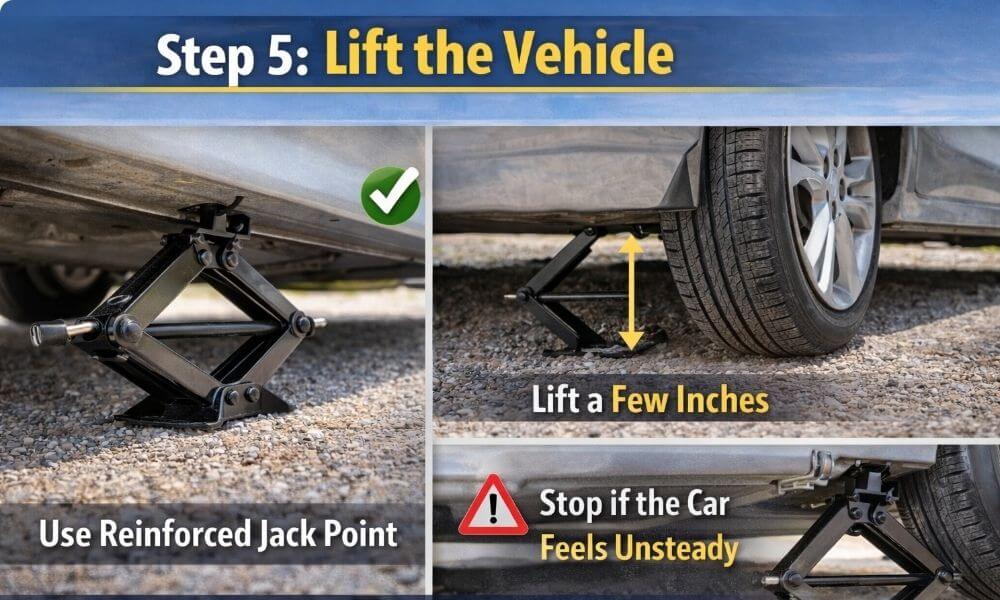
Step 5: Lift the Vehicle
Now slowly start lifting the car using the jack. Turn the handle or pump it depending on the type of jack you have. Go step by step instead of rushing.
Raise the car just enough so the flat tire is completely off the ground. You do not need to lift it very high. A few inches of clearance is enough to remove the tire safely.
While lifting, keep an eye on the car. It should rise evenly and stay steady. If you notice any leaning or movement, stop right away and check the jack position again.
The car might feel a bit unstable at this point, and that is normal as long as the ground is flat and the jack is correctly placed. Take your time and avoid sudden movements.
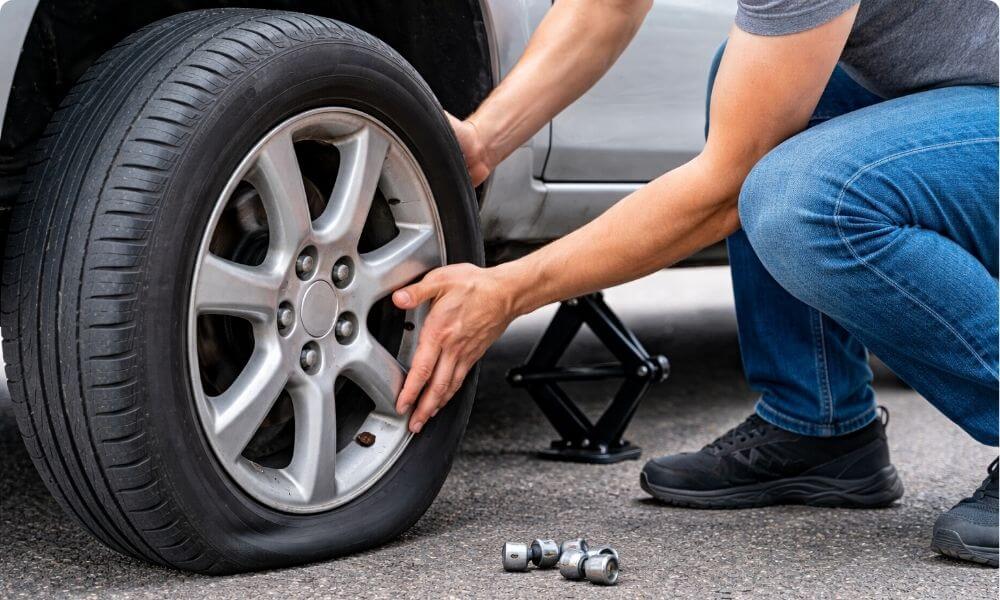
Step 6: Remove the Flat Tire
Now that the car is lifted, fully remove the lug nuts you loosened earlier. Turn them counterclockwise until they come off completely. Keep them in a safe place where they won’t roll away or get lost.
Once all the nuts are removed, you can take the tire off the car. Hold the tire with both hands and pull it straight toward you. It should slide off the wheel bolts.
Sometimes the tire may feel stuck, especially if it hasn’t been removed in a long time. If that happens, gently wiggle it side to side. Avoid kicking or forcing it too hard, as that can cause it to slip suddenly.
The tire can be heavier than it looks, so take your time and keep a steady grip while pulling it off.
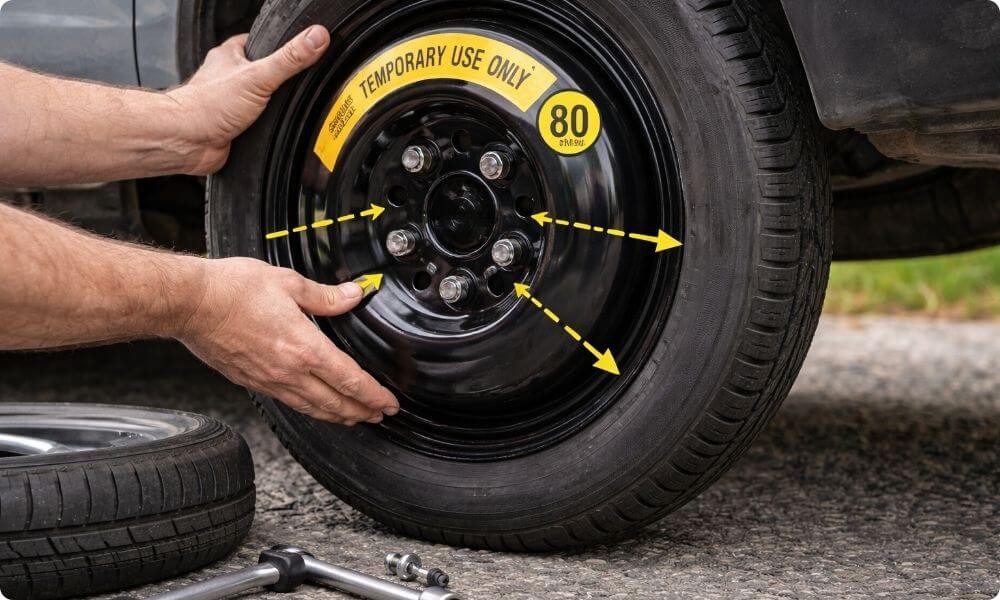
Step 7: Install the Spare Tire
Now take the spare tire and carefully lift it into place. Line up the holes in the tire with the metal bolts sticking out from the wheel hub.
This part can take a little patience. The tire needs to sit flat against the car before you start tightening anything. If it does not line up easily, gently move it until it fits properly.
Once it is in place, start putting the lug nuts back on by hand. Turn them clockwise until they feel snug. Do not use the wrench yet.
Just tighten them enough so the tire stays in place while the car is still lifted. They do not need to be very tight at this stage. You will fully tighten them later after the car is back on the ground.
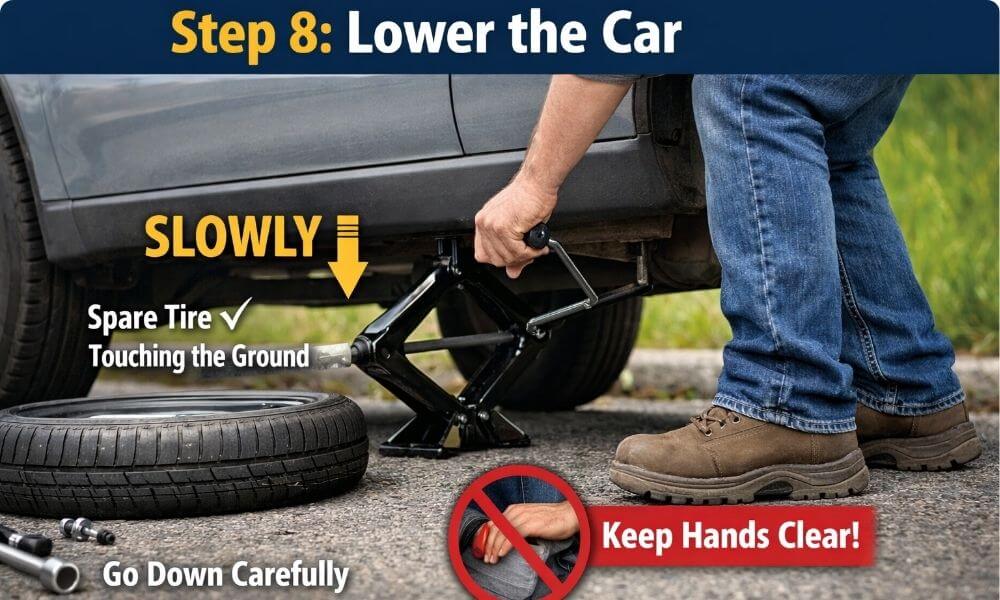
Step 8: Lower the Car
Now it’s time to bring the car back down. Slowly turn or release the jack so the vehicle lowers in a controlled way. Go gently and do not rush this part.
As the car comes down, the spare tire will slowly touch the ground. Once the car is fully resting on the tire, you can safely remove the jack.
Make sure your hands and feet are not under the car while lowering it. Even though you are going slow, it is still important to stay careful.
After the car is fully on the ground, pull the jack out and set it aside. At this point, the tire is holding the weight of the car, so everything should feel stable again.
Step 9: Tighten Lug Nuts Fully
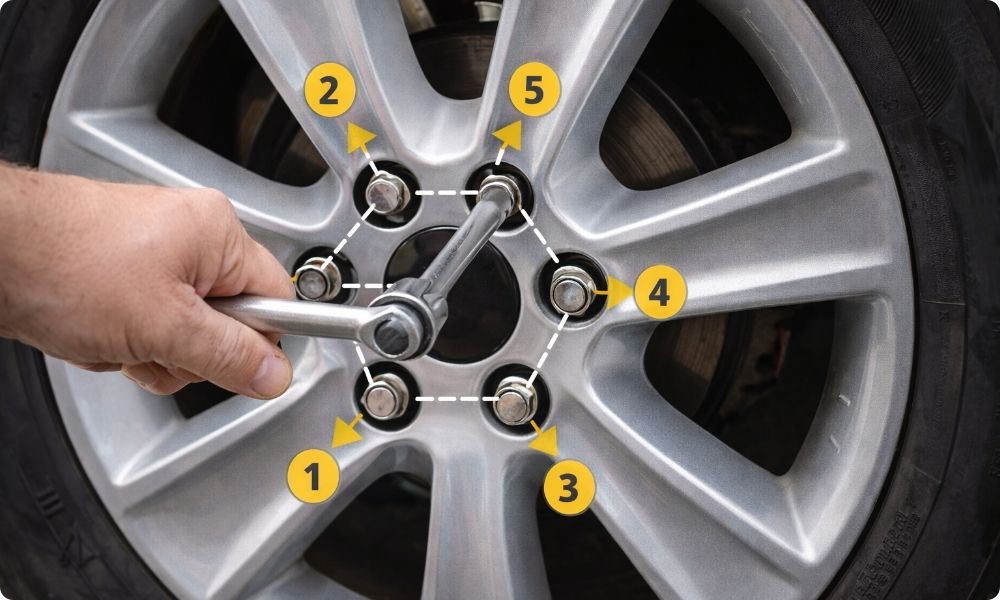
Now that the car is back on the ground, it’s time to fully tighten the lug nuts. Use the lug wrench and turn each nut clockwise until it feels tight and secure.
Do not just go around in a circle. Instead, tighten them in a “star pattern.” That means you tighten one nut, then move to the opposite one, then keep crossing over. This helps the wheel sit evenly against the car.
If you only tighten them in order, one side can get tighter than the other. That can make the wheel sit unevenly, which is not good for safety or balance.
You do not need to force them extremely hard, but they should feel firmly tight. If you have to, use your body weight carefully to give them a final strong turn.
After this step, the wheel should feel solid and stable. It is a good idea to check the nuts again after driving a short distance, just to make sure everything stays tight.
Read More: How Long Do Tires Last? A Complete Guide
What to Do After Changing the Tire
After you finish changing the tire, the job is not fully done yet. A few small follow-up steps are important for your safety and the health of your car.
Drive a short distance, then stop and check the lug nuts again. Sometimes they can loosen slightly after the car starts moving. A quick recheck helps make sure everything is still tight and secure.
Be careful when driving on a spare tire. Most spare tires are not made for long trips or high speeds. Keep your speed low and avoid sudden braking or sharp turns if possible. It may feel a bit different while driving, so take it slow.
Try to visit a repair shop as soon as you can. The spare tire is only a temporary solution, not a long-term replacement. A mechanic can tell you if the old tire can be fixed or if it needs to be replaced.
Do not ignore the damaged tire for too long. Even if the car feels fine, driving on a spare for days or weeks is not safe. Getting it repaired quickly helps you avoid another problem later.
Common Mistakes to Avoid
Changing a tire is not complicated, but a few small mistakes can make it unsafe or much harder than it needs to be. Knowing these ahead of time helps you avoid trouble.
- Lifting the car before loosening the nuts
This makes the job much harder. The wheel can spin, and you will struggle to loosen tight nuts safely. - Placing the jack in the wrong spot
The jack must go on a strong metal part of the car. If it is placed incorrectly, the car can slip or get damaged. This is one of the most serious mistakes. - Not tightening the nuts properly
If the nuts are too loose, the wheel can become unsafe while driving. If they are too tight, they may be hard to remove later. They should feel firm and secure. - Standing under the car
Never place any part of your body under a lifted car. Even if it looks stable, the jack alone is not something you should fully trust. - Ignoring safety signals (hazard lights, warning triangle)
These signals are there to warn other drivers. Without them, other vehicles may not notice you in time, especially at night or in poor weather.
Taking your time and avoiding these mistakes makes the whole process much safer and less stressful.
Troubleshooting (Real-Life Problems & Fixes)
Sometimes things don’t go as smoothly as planned. That’s normal. Here are a few common problems and what you can do about them in a simple way.
Problem: Lug nuts won’t move
If the lug nuts feel stuck, don’t panic. This happens often, especially if they haven’t been removed in a long time.
Try using your body weight by pressing down firmly on the wrench. A steady push usually works better than quick force. Make sure the wrench is sitting properly on the nut so it doesn’t slip.
If you still can’t move them, a bit of penetrating oil can help loosen rust. You may need to wait a few minutes after spraying before trying again.
Problem: Car won’t lift properly
If the car isn’t lifting smoothly, stop and check the jack. It might not be placed correctly under the strong metal jack point.
Sometimes the ground is also the issue. Soft soil or uneven pavement can make lifting difficult and unsafe. In that case, move the car slightly to a flatter, harder surface if possible.
Even a small change in position can make a big difference.
Problem: Spare tire is flat
This is frustrating, but it does happen. A spare tire is not always checked regularly, so it may lose air over time.
If the spare is also flat, the safest option is to call roadside assistance. Trying to drive on it can damage the wheel or make the situation worse.
If you have an emergency tire repair kit, you can use it for a temporary fix. It is not a permanent solution, but it may help you reach a nearby repair shop safely.
When Not to Change the Tire Yourself
There are times when it is better to stop and call for help instead of trying to do it yourself. Safety comes first, even if it takes longer.
- On a busy highway with no safe shoulder – If cars are flying past and there is nowhere safe to stand, do not try to change the tire there. Move to the safest spot you can and call roadside assistance.
- During severe weather – Heavy rain, strong wind, snow, or poor visibility can make the job much more dangerous. The ground may also be slippery, which makes the jack less stable.
- If you do not have the right tools – Without a jack, lug wrench, or spare tire, the job is not realistic. Trying to improvise can waste time and create more risk.
- If the car feels unstable – If the car is leaning, sinking into soft ground, or shifting on the jack, stop right away. That is not a safe setup.
In these situations, it is smarter to call roadside assistance or get professional help. A little waiting is better than taking an unnecessary risk.
FAQs About Changing a Tire
How long does it take to change a tire?
For most beginners, it takes about 20 to 40 minutes. If it’s your first time, it may take a little longer. With practice, it becomes faster and easier.
Can I drive on a spare tire for a long time?
No, a spare tire is only temporary. It is made for short trips to a repair shop. Try not to drive long distances or at high speed with it.
What should I do if I don’t have a jack or lug wrench?
If you don’t have the basic tools, you should not try to change the tire yourself. In that case, it is safer to call roadside assistance or a towing service.
Is it safe to change a tire at night?
It can be safe if you are in a well-lit, quiet area and follow safety steps like hazard lights and a warning triangle. If the area feels unsafe or too dark, it is better to wait for help.
What if I can’t loosen the lug nuts?
This is common. Try pressing down firmly on the wrench using your body weight. If they still won’t move, a little penetrating oil can help. If nothing works, call for assistance.
Do I need to tighten the lug nuts again later?
Yes. After driving a short distance, stop and check them again. Sometimes they can loosen slightly after the car starts moving.
Can I change a tire alone?
Yes, most people can do it alone if the situation is safe. However, if you feel unsure or the location is risky, it is better to wait for help.
Final Verdict
Changing a tire might look difficult at first, especially if you’ve never done it before. But the truth is, anyone can learn it. You don’t need special skills or a mechanical background. You just need to follow the steps slowly and stay calm.
The most important things are safety and preparation. If you take your time, use the right tools, and choose a safe place to work, the process becomes much easier than most people expect. Most problems happen when people rush or skip basic safety steps.
It also helps a lot to practice once when you are not in an emergency. Even if you just try loosening the nuts or finding the jack in your car, it builds confidence. That small practice can make a big difference when you actually need it.
Once you’ve done it, you’ll realize it’s not as scary as it seems. And that confidence stays with you every time you drive.