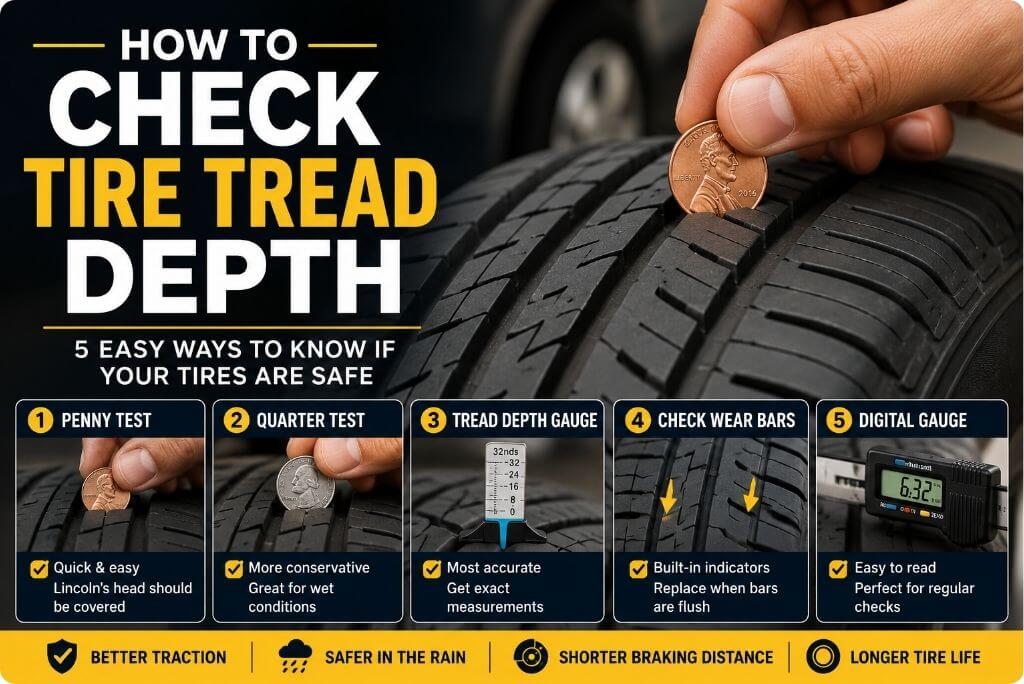
How to Check Tire Tread Depth: Easy Methods
Tire tread is one of the simplest things to check, but it makes a big difference in safety. Good tread helps your tires grip the road, stop more confidently, and push water away so your vehicle is less likely to slide in rain or wet conditions. NHTSA recommends checking tread depth at least once a month, and it says tires should be replaced when tread reaches 2/32 of an inch.
This guide shows you exactly how to check tire tread depth at home, what the numbers mean, and when your tires still have life left versus when they are ready for replacement. It is based on trusted tire-safety guidance from NHTSA, Michelin, Bridgestone, and Tire Rack.
What Is Tire Tread Depth?
Tire tread depth is the measurement of how deep the grooves are on your tire’s surface. These grooves are the channels that make contact with the road and help your tires grip properly.
As you drive, the tread slowly wears down. Every mile, braking, turning, and driving on rough roads removes a tiny amount of rubber. Over time, the grooves become shallower.
Those grooves do an important job. They push water away from the tire when you’re driving on wet roads. This helps the tire stay in contact with the pavement and reduces the chance of hydroplaning, which happens when a tire rides on top of water instead of gripping the road.
In the United States, tire tread depth is measured in 32nds of an inch. Most new passenger tires start with about 10/32″ to 12/32″ of tread depth, depending on the tire type and manufacturer.
As the tread gets lower, the tire can still look acceptable from a distance, but its ability to handle rain begins to decrease.
Expert Tip: Even if your tires haven’t reached the legal replacement limit, wet-road traction can decline noticeably as the tread wears down. Checking tread depth regularly helps you spot this early and replace tires before they become a safety concern.
Why Tire Tread Depth Matters for Safety
Tread depth matters because it helps your tire hold the road. When the grooves are deep enough, they move water out from under the tire so the rubber can stay in contact with the pavement.
That matters most in rain. If the tread is too worn, water has nowhere to go, and the tire can start sliding over the wet surface instead of gripping it. That is how hydroplaning becomes more likely.
Tread depth also affects stopping distance. In an emergency, a tire with more tread usually gives you better grip, which can help the car stop sooner on wet roads. Worn tires may still work in dry weather, but they often lose confidence and control when the road is slick.
It also affects how the car feels in turns. Good tread helps the tire respond more cleanly when you steer, while worn tread can make the car feel less steady, especially in rain or on curving roads.
Over time, low tread can hurt overall performance too. The ride may feel rougher, traction can drop, and you may notice the tires are simply not as predictable as they once were.
Statistic Box: Worn tires significantly increase hydroplaning risk and reduce wet-weather braking performance.
Signs Your Tire Tread May Be Too Low
You don’t always need a measuring tool to notice that your tire tread is getting low. In many cases, your car will give you warning signs.
Take a look at your tires. If the grooves look shallow or the tread surface appears smooth, the tires may be nearing the end of their useful life.
Pay attention to how the car feels, especially in the rain. If the tires slip more easily during acceleration or the car doesn’t seem to grip wet roads as well as it used to, worn tread could be the reason.
You might also notice that the car takes longer to stop on wet pavement. This change often happens gradually, so many drivers don’t realize it right away.
Another clue is the traction control light. If it comes on more often than usual during normal driving, your tires may be struggling to maintain grip.
Finally, check for wear bars. These are small raised sections built into the tread grooves. When the tread is worn down to the same height as these bars, it’s time to start thinking seriously about replacement.
Quick Checklist
✓ Tire slips in wet conditions
✓ Wear bars are visible
✓ Tread grooves appear shallow
✓ Uneven wear is noticeable
If you notice one or more of these signs, take a few minutes to measure your tread depth. A quick check now can help you avoid driving on tires that no longer provide the grip you expect.
Tools You Can Use to Check Tire Tread Depth
You don’t need expensive equipment to check your tire tread. There are several simple ways to do it, and most take only a few minutes.
- Penny Test: A quick way to get a general idea of whether your tread is getting low. It costs nothing and uses a coin you probably already have.
- Quarter Test: Similar to the penny test but uses a slightly deeper benchmark. It’s helpful for checking whether your tires still have reasonable tread for wet roads.
- Tire Tread Depth Gauge: A small, inexpensive tool that gives an actual tread measurement. It’s easy to use and provides more reliable results than coin tests.
- Built-In Wear Bars: Most tires have raised indicators inside the grooves. If these bars are easy to see and nearly level with the tread, the tires are getting worn.
- Digital Tread Depth Gauge: An electronic version of the tread gauge with a display screen. It provides precise readings and is convenient if you check your tires regularly.
Recommendation: If you want the most accurate measurement, use a tread depth gauge or digital gauge. If you simply need a quick check at home, the penny and quarter tests are convenient and can help you spot potential problems in minutes.
How to Check Tire Tread Depth (Step-by-Step)
You do not need a shop visit to get a useful answer. In just a few minutes, you can check tread depth with a coin, a gauge, or the wear bars built into the tire. NHTSA and tire manufacturers both recommend checking more than one spot, because wear can vary across the tire.
Method 1: How to Check Tire Tread Depth With a Penny
The penny test is the easiest way to get a quick idea of how much tread is left on your tire. It is not perfect, but it is fast, simple, and good enough for a basic check at home.
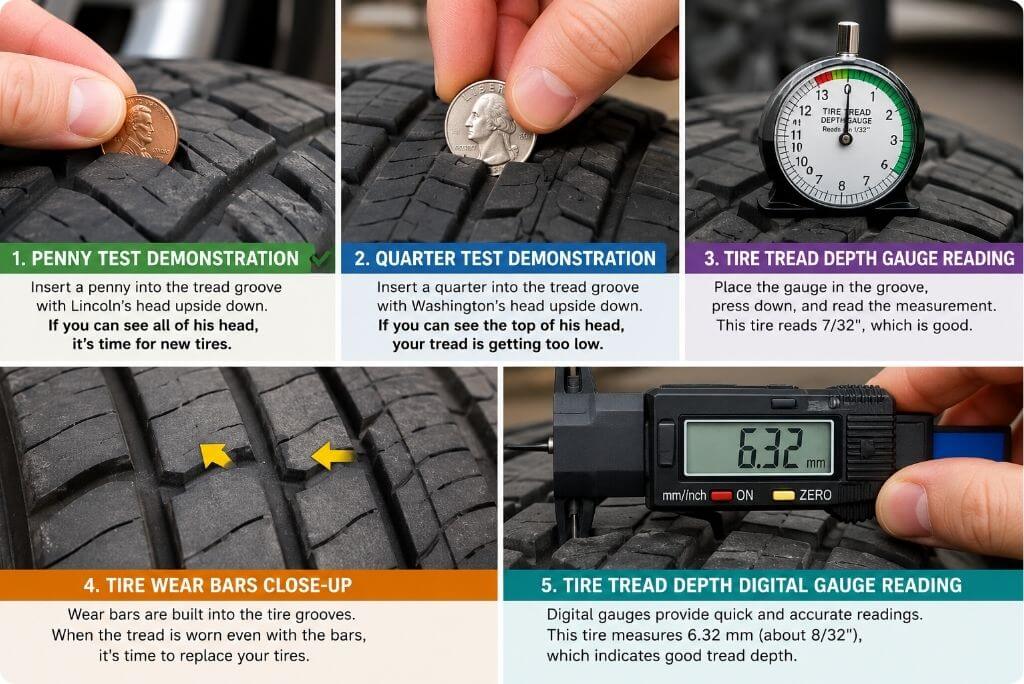
Take a penny and place it into one of the main grooves on the tire with Lincoln’s head pointing down. Look at how much of his head you can see. If most or all of the head is visible, the tread is probably getting too low.
Here is the simple way to do it:
- Find a deep groove in the tire tread.
- Put the penny in with Lincoln’s head facing down.
- Check how much of his head shows above the groove.
- Repeat the test in a few spots across each tire.
Do not test only one place. Tires can wear unevenly, so one section may look fine while another is close to worn out.
A small drawback of the penny test is that it only gives a rough check. If you want a more exact reading, use a tread depth gauge. But for a quick safety check, the penny test works well and takes less than a minute.
Method 2: How to Check Tire Tread Depth With a Quarter
The quarter test is another easy way to check your tire tread at home. Some drivers prefer it because it is a little more cautious than the penny test and can give an earlier warning that the tread is getting low.
Place a quarter into a tread groove with Washington’s head facing down. Then look at how much of his head is visible. If you can see the top of his head, your tires may be wearing down and should be checked more closely.
For the best results:
- Insert the quarter into a few different grooves.
- Check all four tires, not just one.
- Look for areas where more of Washington’s head is showing.
The quarter test is useful because it is quick and takes only a minute. The downside is that it still gives only an estimate. If you want an exact measurement or are unsure about your tires’ condition, a tread depth gauge is the better option.
Method 3: How to Check Tire Tread Depth with a Tire Tread Depth Gauge
A tire tread depth gauge is one of the easiest ways to get an accurate measurement. The tool is inexpensive, small enough to keep in your glove box, and gives you a specific reading instead of an estimate.
To use it, place the probe into a tread groove and press the flat base of the gauge against the tire. The gauge will display the tread depth measurement.
Check several spots across the tire because tread does not always wear evenly.
| Tread Depth | Condition |
| 8/32″–12/32″ | Excellent |
| 6/32″ | Good |
| 4/32″ | Fair – Monitor Closely |
| 2/32″ | Replace Immediately |
A reading of 6/32″ still provides good tread for most driving conditions. Around 4/32″, it’s wise to start paying closer attention, especially if you frequently drive in heavy rain. At 2/32″, the tire should be replaced.
Expert Recommendation: A tread depth gauge is the most accurate and repeatable way to check tire tread. It takes only a minute to use and removes the guesswork from deciding whether your tires are still safe.
Method 4: How to Check Tire Tread Depth with the Built-In Wear Bars
Most modern tires have built-in tread wear indicators, often called wear bars. They are small raised sections hidden inside the tread grooves.
As the tire wears down, the tread gets closer to the height of these bars. Eventually, the wear bars become clearly visible and almost level with the surrounding tread.
Checking them is simple. Look inside the grooves across the tire. If you can easily see the raised bars and they are nearly flush with the tread, the tire is getting worn and should be inspected more closely.
Wear bars are useful because they don’t require any tools. The drawback is that they only tell you when the tread is already quite low. They won’t show you exactly how much tread is left.
For a quick inspection, though, wear bars are one of the easiest ways to spot tires that may need replacement soon.
Method 5: How to Check Tire Tread Depth with a Digital Tread Depth Gauge
A digital tread depth gauge works like a regular tread gauge but shows the measurement on a small screen. You place the probe into the tread groove, press the base flat against the tire, and read the number on the display.
The biggest advantage is precision. The digital display makes the reading easy to see and removes much of the guesswork. This can be helpful if you’re comparing tread depth across all four tires or tracking wear over time.
A digital gauge is especially useful if you maintain more than one vehicle, own a performance car, or drive long distances regularly. In these situations, keeping a close eye on tire condition can help you plan replacements before problems develop.
The downside is that a digital gauge costs more than a basic tread gauge and usually needs a battery. For occasional checks, a simple manual gauge is often enough. But if you inspect your tires regularly, a digital gauge is a convenient tool to keep in your garage.
Where Should You Measure Tire Tread?
Don’t measure the tread in just one place. Tires often wear unevenly, so checking only the center or one edge can give you the wrong impression.
Take measurements in three areas of each tire:
- Outer shoulder: The edge closest to the outside of the vehicle.
- Center tread: The middle section that carries much of the vehicle’s weight.
- Inner shoulder: The edge facing the underside of the vehicle.
It’s also a good idea to check several spots around the tire, not just one section.
This extra minute can tell you a lot about your tires. If one area is more worn than another, there may be an underlying issue.
Uneven tread readings can point to:
- Incorrect tire pressure
- Wheel alignment problems
- Suspension wear
- Tires not being rotated regularly
A tire with uneven wear may still have plenty of tread in one area but be worn out in another. That’s why checking multiple locations gives you a more accurate picture of your tire’s condition.
What Is the Minimum Safe Tire Tread Depth?
In many places, the legal minimum tire tread depth is 2/32 of an inch. At this point, the tire is considered worn out and should be replaced.
However, the legal minimum and the safest replacement point are not always the same thing.
For wet-weather driving, many tire experts recommend paying close attention once tread reaches about 4/32 of an inch. At this depth, the tire can still be legal, but its ability to move water and maintain grip in the rain starts to decline.
If you regularly drive in snow, replacing tires even earlier can be a smart decision. Deeper tread helps the tires bite into snow and maintain better traction.
A good way to think about it is this:
- 2/32″ = Legal minimum and replacement time
- Around 4/32″ = Start planning for replacement, especially if you drive in frequent rain
- Snow driving = Consider replacing sooner for better winter traction
Important: A tire can still meet the legal tread requirement and yet no longer perform as well on wet roads. Waiting until the last possible moment may save money in the short term, but it can reduce traction when you need it most.
What Causes Tires to Wear Unevenly?
Uneven wear is often a clue, not just a tire problem. Bridgestone and Michelin both say improper inflation and out-of-spec alignment are two of the most common causes of irregular tread wear. Underinflation often wears the outer edges more, while overinflation can wear the center faster.
Other causes include poor balancing, suspension issues, and not rotating tires often enough. When you notice a pattern, it is worth checking the tire pressure first and then having the alignment and suspension inspected if the wear keeps showing up.
When Should You Replace Your Tires?
Replace your tires when tread reaches 2/32 of an inch, when wear bars are flush, or when wear becomes uneven enough that the tire no longer performs well. NHTSA says that 2/32 is the minimum point for safe use, and Michelin notes that declining grip or longer braking distances can signal a tire that is no longer performing as it should.
A good rule is to replace sooner if you regularly drive in wet weather, snow, or slush. In real life, safety margin matters more than squeezing out every last mile.
Common Tire Tread Depth Mistakes to Avoid
A few common mistakes can lead to incorrect conclusions about tire condition.
Avoid these errors:
- Checking only one tire
- Measuring only the center tread
- Ignoring uneven wear patterns
- Waiting until the tires are almost bald
- Assuming legal minimum tread is automatically safe
Taking measurements in several locations and inspecting all four tires gives you the most reliable assessment.
Frequently Asked Questions
How often should I check tire tread depth?
Check it at least once a month, and also before long trips. That matches NHTSA’s guidance for regular tire checks.
Can I use the penny test on all tires?
Yes. It is a fast and free screen for very worn tires, but a tread gauge gives a more exact result.
Is 4/32″ tire tread still safe?
It can still be usable, but AAA says that stopping distances and wet-road performance begin to deteriorate around that point, so it is a good time to start planning for replacement.
Are tread wear bars accurate?
Yes. They are built into the tire to show when tread has reached the legal limit or very close to it. NHTSA says to replace the tire when the tread becomes level with the indicator bars.
Should all four tires have the same tread depth?
They should be close enough to keep handling balanced. Large differences can affect traction and may point to uneven wear or maintenance issues.
Conclusion
Learning how to check tire tread depth does not take much time, but it can tell you a lot about your safety. A penny test, a quarter test, a tread gauge, or the built-in wear bars can all help you spot trouble early. NHTSA recommends checking tread monthly, and tire manufacturers agree that wet performance drops as tread gets shallow.
The best habit is simple: check all four tires, measure more than one spot, and do not wait until the tires are bald. If the tread is getting close to the limit, plan ahead and replace them before the next rainy drive becomes a risk.