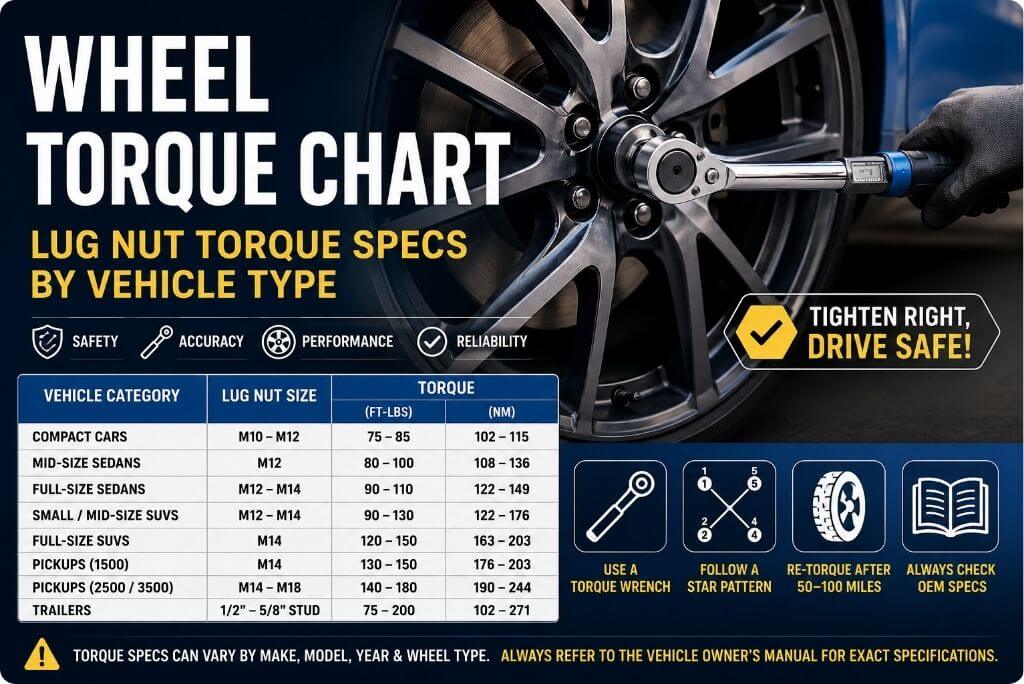
Wheel Torque Chart: Recommended Lug Nut Torque Specifications by Vehicle Type
Getting wheel torque right is not a small detail. It is one of the most important steps in safe wheel installation, tire rotation, and brake work. If lug nuts are too loose, the wheel can shift and create a dangerous driving condition. If they are too tight, you can damage studs, warp brake rotors, or make future removal much harder than it should be.
This wheel torque chart is designed as a practical reference for drivers, DIY mechanics, and technicians who need a fast way to estimate proper lug nut torque by vehicle class and stud size. It also explains how to torque wheels correctly so the numbers in the chart actually translate into safe, reliable installation.
Important: Always check the owner’s manual or OEM service information for the exact torque specification for your vehicle. Use this chart as a general reference, not a replacement for manufacturer guidance.
What Is a Wheel Torque Chart?
A wheel torque chart is a simple guide that shows how tight your wheel lug nuts should be. It gives recommended torque values for different types of vehicles, wheel sizes, and stud sizes.
When you install or remove a wheel, the lug nuts need to be tightened to the correct level. If they are too loose, the wheel may not stay securely attached. If they are too tight, you can damage the wheel studs, lug nuts, or other parts.
A wheel torque chart helps you find the right torque setting for your vehicle. Instead of guessing, you can use the chart to tighten the lug nuts to the recommended specification.
Torque is the amount of twisting force used to tighten a lug nut. It is usually measured in foot-pounds (ft-lbs) or newton-meters (Nm). Both units measure the same thing, just in different systems.
Think of a wheel torque chart as a quick reference that helps you tighten your wheels safely and correctly.
Why Wheel Torque Matters
Getting wheel torque right is really about keeping the wheel safely attached to the car. It may seem like a small step, but it directly affects how secure and stable your wheels are while driving.
If lug nuts are not tightened enough, they can slowly loosen over time. This can lead to vibration, uneven movement, or in serious cases, the wheel becoming unsafe on the road.
On the other hand, too much tightness creates its own problems. It can put extra stress on brake parts and sometimes lead to warped brake rotors, which you may notice as shaking when braking.
Incorrect torque can also stretch or damage the wheel studs and lug nuts. Once that happens, they don’t hold as well and usually need to be replaced.
When done correctly, wheel torque spreads the force evenly across the wheel. That even pressure helps the wheel sit flat against the hub and stay stable during everyday driving.
It’s a small detail in the process, but it’s one of the main things that keeps the wheel secure over time.
Wheel Torque Chart by Vehicle Category
The chart below provides a broad reference for common vehicle types. Exact specs can vary based on model year, wheel design, fastener type, and whether the vehicle uses steel or alloy wheels.
| Vehicle Category | Typical Lug Nut Size | Torque (ft-lbs) | Torque (Nm) | Notes |
| Compact Cars | M10–M12 | 75–85 | 102–115 | Honda Civic, Toyota Corolla class |
| Mid-Size Sedans | M12 | 80–100 | 108–136 | Most family sedans |
| Full-Size Sedans | M12–M14 | 90–110 | 122–149 | Heavier passenger vehicles |
| Sports Cars | M12–M14 | 85–110 | 115–149 | Performance wheels may vary |
| Crossovers (CUVs) | M12–M14 | 90–110 | 122–149 | Verify OEM specs |
| Small SUVs | M12–M14 | 90–110 | 122–149 | Common range |
| Mid-Size SUVs | M14 | 100–130 | 136–176 | Most modern SUVs |
| Full-Size SUVs | M14 | 120–150 | 163–203 | Tahoe, Expedition class |
| Minivans | M12–M14 | 95–110 | 129–149 | Family vans |
| Half-Ton Pickups (1500 Series) | M14 | 130–150 | 176–203 | F-150, Silverado 1500 |
| Three-Quarter-Ton Pickups (2500 Series) | M14–M16 | 140–165 | 190–224 | Heavy-duty applications |
| One-Ton Pickups (3500 Series) | M14–M18 | 150–180 | 203–244 | Dual-rear-wheel models may differ |
| Commercial Vans | M14–M16 | 140–180 | 190–244 | Cargo and fleet vehicles |
| Light Trailers | 1/2″ Stud | 75–90 | 102–122 | Utility trailers |
| Medium Trailers | 9/16″ Stud | 90–120 | 122–163 | Boat and equipment trailers |
| Heavy Trailers | 5/8″ Stud | 150–200 | 203–271 | Larger equipment trailers |
| Travel Trailers/RVs | 1/2″–9/16″ Stud | 90–120 | 122–163 | Verify axle manufacturer specs |
| Class C Motorhomes | M14–M16 | 140–160 | 190–217 | Based on chassis manufacturer |
| Class A Motorhomes | M16–M22 | 450–500+ | 610–678+ | Heavy-duty wheel systems |
Wheel Torque Chart by Stud Size
If you know the stud size, this table can help you narrow down a safe torque range.
| Stud Size | Torque Range (ft-lbs) | Torque Range (Nm) |
| M10 x 1.25 | 45–55 | 61–75 |
| M10 x 1.5 | 50–60 | 68–81 |
| M12 x 1.25 | 70–80 | 95–108 |
| M12 x 1.5 | 80–90 | 108–122 |
| M14 x 1.5 | 95–120 | 129–163 |
| M14 x 2.0 | 100–140 | 136–190 |
| M16 x 1.5 | 130–160 | 176–217 |
| M18 x 1.5 | 180–220 | 244–298 |
| 7/16″ Stud | 55–65 | 75–88 |
| 1/2″ Stud | 75–90 | 102–122 |
| 9/16″ Stud | 95–120 | 129–163 |
| 5/8″ Stud | 150–200 | 203–271 |
| 3/4″ Stud | 250–350 | 339–475 |
Popular Vehicle Wheel Torque Examples
These common examples can help readers quickly find a familiar reference point.
| Manufacturer | Common Models | Torque (ft-lbs) |
| Honda | Civic, Accord, CR-V | 80 |
| Toyota | Corolla, Camry, RAV4 | 76–83 |
| Nissan | Altima, Rogue | 80–98 |
| Hyundai | Elantra, Sonata, Tucson | 80–94 |
| Kia | Forte, Sportage, Sorento | 80–94 |
| Mazda | Mazda3, CX-5 | 80–108 |
| Subaru | Impreza, Outback, Forester | 89 |
| Volkswagen | Jetta, Passat, Tiguan | 88–96 |
| BMW | Most passenger vehicles | 88–103 |
| Mercedes-Benz | Passenger vehicles | 96–110 |
| Audi | A4, A6, Q5 | 89–120 |
| Ford | Escape, Explorer | 100–110 |
| Ford F-150 | Pickup | 150 |
| Chevrolet | Malibu, Equinox | 100 |
| Chevrolet Silverado 1500 | Pickup | 140 |
| GMC Sierra 1500 | Pickup | 140 |
| RAM 1500 | Pickup | 130 |
| Jeep Wrangler | SUV | 95–130 |
| Tesla Model 3 | EV | 129 |
| Tesla Model Y | EV | 129 |
Torque Conversion Chart
| Ft-Lbs | Nm |
|---|---|
| 50 | 68 |
| 60 | 81 |
| 70 | 95 |
| 80 | 108 |
| 90 | 122 |
| 100 | 136 |
| 110 | 149 |
| 120 | 163 |
| 130 | 176 |
| 140 | 190 |
| 150 | 203 |
| 160 | 217 |
| 170 | 230 |
| 180 | 244 |
| 190 | 258 |
| 200 | 271 |
How to Properly Torque Lug Nuts
Step 1: Hand-thread the lug nuts first
Start each lug nut by hand before using any tool. This helps the threads line up correctly and lowers the chance of cross-threading.
Step 2: Tighten in a star pattern
Do not tighten the nuts one after another around the wheel. Move across the wheel in a star pattern so the wheel seats evenly against the hub.
Step 3: Tighten in stages
Bring the nuts up gradually instead of tightening them all the way at once. A few light passes are better than one hard pull.
Step 4: Finish with a torque wrench
Use a calibrated torque wrench for the final tightening. That gives you the correct tightness instead of guessing by feel.
Step 5: Check them again after driving
If the wheels were just installed, recheck the torque after about 50 to 100 miles. Wheels can settle slightly, and a second check helps confirm everything is still secure.
A quick note on impact wrenches
An impact wrench is fine for removing lug nuts or snugging them down at first, but it should not be used for the final step. It is too easy to overtighten the nuts without realizing it.
Uneven or excessive torque can cause wheel vibration, braking issues, and extra wear on parts. Taking a few extra minutes to torque the nuts correctly is worth it.
Tightening Pattern Guide
When you tighten wheel nuts, the order matters just as much as how tight they are. The goal is simple: apply even pressure so the wheel sits flat against the hub.
If you tighten them in a circle, one side can pull tighter than the other. That can slightly tilt the wheel and lead to vibration later.
4-lug wheels
Tighten in a crisscross pattern:
1 → 3 → 2 → 4
5-lug wheels
Use a star pattern to spread pressure evenly:
1 → 3 → 5 → 2 → 4
6-lug wheels
Move across the wheel instead of going around:
1 → 4 → 2 → 5 → 3 → 6
8-lug wheels
Follow a cross-over pattern, always moving to the opposite side next.
A simple way to think about it is: never tighten the next lug next to the last one. Always jump across the wheel.
Common Wheel Torque Mistakes
Even simple wheel jobs can go wrong if a few basic steps are missed. These are the mistakes that cause most problems in real use.
- Over-torquing lug nuts: Tightening too much can stretch the studs and make future removal harder. It can also stress brake parts over time.
- Guessing torque instead of measuring it: Relying on “feel” is risky. Small differences in tightness can lead to vibration or loose wheels later.
- Using an impact tool as the final step: Impact tools are fast, but they don’t give accurate torque. It’s easy to tighten too much without noticing.
- Ignoring re-torque after driving: New wheel installations can settle after a short drive. Skipping the check after 50–100 miles can leave nuts slightly loose.
- Mixing up torque values: Using a generic number instead of the vehicle’s correct spec can cause problems. Even similar vehicles can have different requirements.
Most of these issues come from rushing the job. Taking a few extra minutes to measure torque properly makes a big difference in safety and wheel life.
Read More: Wheel Bolt Pattern Chart
Steel Wheels vs Alloy Wheels
Steel and alloy wheels don’t usually change the basic torque numbers by themselves. In most cases, the vehicle manufacturer already sets one correct torque value that works for that setup.
The main difference is how forgiving the wheel is. Alloy wheels are more sensitive if the torque is wrong. Too much tightness can put extra stress on the wheel surface or studs, while too little can let the wheel loosen slightly over time.
Steel wheels are a bit tougher and can handle minor mistakes better, but they still need the correct torque. They are not immune to damage from over-tightening.
One thing people often miss is that the wheel seat shape and lug nut design matter just as much as the material. A flat seat, cone seat, or ball seat all apply force differently, and using the wrong lug nut style can cause uneven tightening even if the torque number is correct.
In short, it’s not just about steel vs alloy. The full setup—wheel design, seat type, and lug nut match—works together to keep the wheel secure.
When to Check OEM Torque Specs
OEM torque specs are the exact numbers set by the vehicle maker. These are always the safest reference because they are based on the car’s design, weight, and wheel setup.
You should check them anytime something about the wheel setup changes. Even small changes can affect how the wheel sits and how much force it needs.
After changing wheel type or size, it’s important to confirm the correct torque. Different wheels can spread pressure differently, even on the same vehicle.
If you install aftermarket wheels, always double-check the specs. Some aftermarket setups may need different lug nuts or seating styles, which can change how torque behaves.
You should also verify torque after hub, brake, or suspension work. These parts affect how the wheel connects to the car, so the original setting may not be the same afterward.
And if your vehicle manual shows a different number than a general chart, always trust the manual. Generic charts are helpful, but OEM specs are the final word for safety.
Read More: Wheel Offset Chart
FAQs
What happens if lug nuts are too tight?
Over-tightened lug nuts can stretch wheel studs, damage threads, make roadside tire changes harder, and contribute to rotor distortion.
Can loose wheels damage the hub?
Yes. Loose lug nuts can let the wheel move against the hub, which may damage the wheel, studs, brake rotor, or mounting surface.
Do all vehicles use the same torque?
No. Torque varies based on vehicle weight, stud size, wheel type, and manufacturer design.
Should lug nuts be re-torqued after installation?
Many manufacturers and tire shops recommend rechecking torque after 50–100 miles, especially after new wheel installation.
Is ft-lbs the same as Nm?
No. They measure the same concept, but they are different units. A torque wrench may show one or both units depending on the model.
Conclusion
A wheel torque chart is a useful reference, but it should never replace the manufacturer’s official specification. The safest approach is simple: check the manual, use a torque wrench, tighten in a star pattern, and recheck after installation if recommended.
Done correctly, proper wheel torque protects the wheel, the studs, the brakes, and the driver.