How to Measure Wheel Bolt Pattern (Complete Step-by-Step Guide)
Buying wheels that do not match your vehicle’s bolt pattern is a mistake that can cost time, money, and a lot of frustration. A wheel can look perfect, fit the style you want, and even seem close in size, but if the bolt pattern is wrong, it will not mount correctly.
This guide explains how to measure wheel bolt pattern step by step in a simple way. You will learn what a bolt pattern is, how to measure 4-lug, 5-lug, 6-lug, and 8-lug wheels, how to read bolt pattern numbers, and how to avoid the most common mistakes. You will also learn how to check wheel fitment beyond bolt pattern, because matching bolt pattern alone does not always mean a wheel will fit.
This article is for anyone who wants to buy new wheels, replace damaged wheels, check used wheels before purchase, or simply understand wheel fitment better.
What Is a Wheel Bolt Pattern?
A wheel bolt pattern is the way the lug holes are spaced on a wheel. It tells you whether the wheel will line up with your vehicle’s hub.
You may also hear it called the lug pattern, bolt circle, or PCD. They all refer to the same basic thing: the size and spacing of the holes where the wheel bolts on.
Why it matters is simple. If the bolt pattern does not match, the wheel will not mount correctly. That can cause fitment problems and create a safety risk. It can also lead to a wasted purchase if you buy wheels that do not fit your vehicle.
A bolt pattern is usually shown with two numbers, like 5×114.3 or 6×135. The first number tells you how many lug holes the wheel has. The second number tells you the size of the circle those holes sit on.
So, for example:
- 5×114.3 means 5 lug holes on a 114.3 mm bolt circle
- 5×127 means 5 lug holes on a 127 mm bolt circle
- 6×135 means 6 lug holes on a 135 mm bolt circle
- 6×139.7 means 6 lug holes on a 139.7 mm bolt circle
A simple way to picture it is this: the lug holes sit around an invisible circle in the center of the wheel. That circle, along with the wheel center, is what you are measuring.
Why Measuring Your Wheel Bolt Pattern Is Important
Measuring your wheel bolt pattern is one of those small steps that can save you from big problems later. Many people skip it and only find out after the wheels don’t fit.
Before buying new wheels, it’s the first thing you should check. Whether you’re going for aftermarket wheels or replacing factory (OEM) ones, the bolt pattern has to match your vehicle exactly. If it doesn’t, the wheel simply won’t bolt on properly.
It’s even more important when buying used wheels. Online marketplaces and salvage yards often list wheels quickly, and small details can be wrong or missing. A wrong guess here can easily lead to buying wheels you can’t use.
If you’re modifying your vehicle, this step becomes even more important. Lifted trucks, off-road builds, and performance setups often use different wheel sizes and styles. In those cases, matching the bolt pattern is only part of making sure everything fits safely.
It also helps you double-check manufacturer information. Even though factory specs are usually correct, mistakes or mix-ups can happen, especially with older vehicles or swapped parts. Measuring gives you confidence that what you’re buying or using is actually right for your car.
Tools Needed to Measure a Wheel Bolt Pattern
You do not need fancy equipment to get a usable measurement. A simple tape measure or ruler can work well enough for most people, especially if you measure carefully.
A tape measure is the easiest tool to use because it is quick and easy to find. A ruler can also work, but it is better for smaller wheels or close measurements. A marker is helpful if you want to mark the starting point so you do not lose track while measuring.
If you want a more exact result, use a digital caliper or vernier caliper. These tools give a tighter, more accurate measurement, which is helpful if you are buying expensive wheels or checking a wheel that is very close to another size.
For the most precise and easiest setup, a bolt pattern gauge is the best choice. It is made for this job, so it removes a lot of guesswork. The only drawback is that most people do not already have one at home.
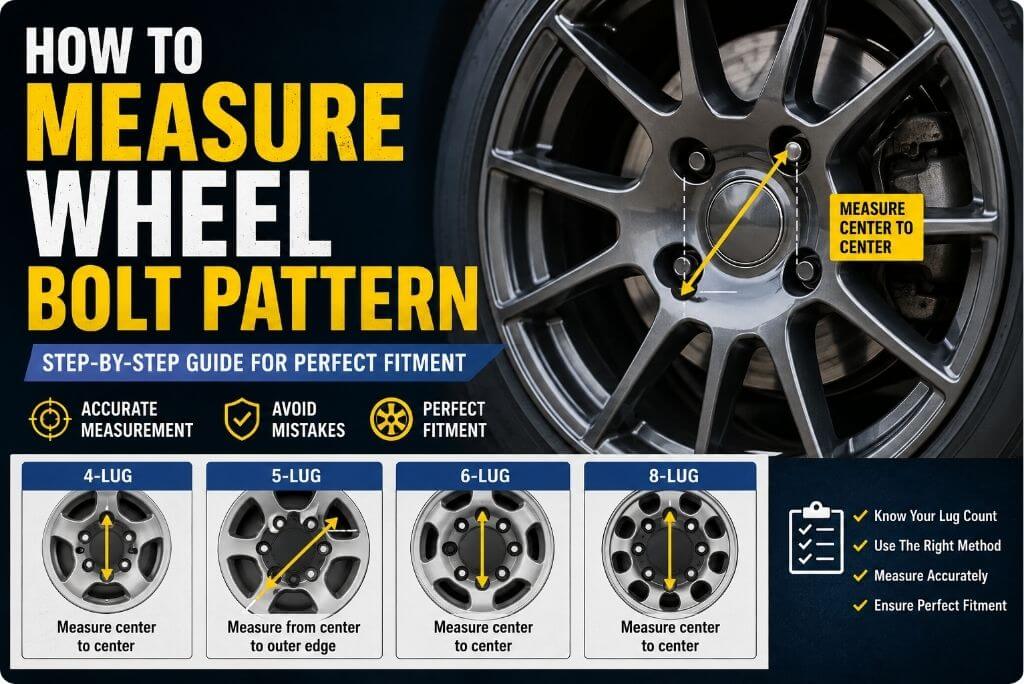
| Tool | Accuracy | Best For |
| Tape measure | Basic | Quick home checks |
| Ruler | Basic | Simple measuring |
| Digital caliper | Excellent | More exact measuring |
| Bolt pattern gauge | Excellent | Professional use |
For most readers, a tape measure is enough to get started. If the fit has to be exact, a caliper or bolt pattern gauge is worth using.
Understanding Wheel Lug Configurations
Wheel bolt patterns are grouped by how many lug holes the wheel has. The number of holes matters because it affects both the measurement method and the type of vehicle the wheel is usually made for.
A 4-lug wheel is common on smaller cars and compact sedans. These wheels are usually lighter and simpler, but they are not as common on larger vehicles.
A 5-lug wheel is very common on SUVs, crossovers, and many passenger cars. This is probably the pattern most people run into when shopping for replacement wheels.
A 6-lug wheel is often used on trucks and mid-size pickups. These wheels are built for vehicles that carry more weight and do more hauling or towing.
An 8-lug wheel is usually found on heavy-duty trucks. These setups are made for stronger loads, so they are less common on everyday vehicles.
| Lug Count | Common Vehicles |
| 4-lug | Small cars, compact sedans |
| 5-lug | SUVs, crossovers, passenger cars |
| 6-lug | Trucks, mid-size pickups |
| 8-lug | Heavy-duty trucks |
A quick way to remember it: the bigger and heavier the vehicle, the more lug holes it usually has.
How to Measure a 4-Lug Bolt Pattern
A 4-lug wheel is the easiest type to measure because the lug holes sit directly across from each other.
Step 1: Locate Opposite Lug Holes
Look for two lug holes that are directly across from one another. These are the holes you’ll measure between.
Step 2: Measure Center-to-Center
Place your tape measure, ruler, or caliper at the center of one lug hole and measure straight across to the center of the opposite hole.
Try to keep the measurement as straight as possible. Even a small error can affect the final result.
Step 3: Record the Measurement
Write down the measurement in millimeters. This number is your bolt circle diameter.
For example, if the distance between the centers of the opposite lug holes is 100 mm, the bolt pattern is:
4×100
The first number (4) represents the number of lug holes, and the second number (100) is the diameter of the bolt circle.
Common Mistakes to Avoid
The most common mistake is measuring from the edge of one hole to the edge of another. Always measure from the center of each hole.
Another mistake is choosing the wrong holes. Make sure you’re measuring between holes that sit directly opposite each other, not holes that are next to one another.
Because the holes are evenly spaced on a 4-lug wheel, measuring correctly is usually quick and straightforward.
How to Measure a 5-Lug Bolt Pattern
A 5-lug bolt pattern is the one that causes the most confusion. Unlike 4-lug, 6-lug, and 8-lug wheels, there are no lug holes directly opposite each other. That’s why many people measure it incorrectly the first time.
Why 5-Lug Wheels Are Different
With a 5-lug wheel, you cannot simply measure from the center of one hole to the center of another hole across the wheel. Because of the uneven spacing, you need to use a different method.
Step 1: Choose Any Lug Hole
Pick any lug hole on the wheel as your starting point.
Step 2: Measure to the Farthest Lug Hole
Measure from the center of your starting lug hole to the outer edge of the lug hole farthest away from it.
This method gives you the bolt circle diameter, which is the number used in the bolt pattern.
Step 3: Record the Measurement
Write down the measurement in millimeters.
For example, if your measurement is 114.3 mm, the bolt pattern is:
5×114.3
The first number represents the five lug holes, while the second number represents the bolt circle diameter.
Common Errors to Avoid
The biggest mistake is measuring from the center of one hole to the center of another hole. On a 5-lug wheel, that method will give you the wrong result.
Another common error is choosing the wrong reference point on the farthest lug hole. Make sure you measure to the outer edge of that hole, not its center.
If you’re unsure, measure twice. A few extra seconds can prevent buying wheels that don’t fit your vehicle.
How to Measure a 6-Lug Bolt Pattern
Measuring a 6-lug bolt pattern is usually easier than measuring a 5-lug pattern because the lug holes are evenly spaced. You can measure directly between holes that sit opposite each other.
Step 1: Identify Opposite Holes
Find two lug holes that are directly across from one another. These are the holes you’ll use for the measurement.
Step 2: Measure Center-to-Center
Measure from the center of one lug hole straight across to the center of the opposite lug hole.
A tape measure can work, but a caliper will give a more accurate result if you have one available.
Step 3: Record the Result
Write down the measurement in millimeters. This number is the bolt circle diameter.
For example, if the measurement is 139.7 mm, the bolt pattern is:
6×139.7
The “6” represents the number of lug holes, and “139.7” represents the diameter of the bolt circle.
Because the holes are evenly spaced, a 6-lug wheel is generally straightforward to measure. Just make sure you’re measuring between opposite holes and using the center of each hole as your starting and ending points.
How to Measure an 8-Lug Bolt Pattern
An 8-lug bolt pattern is measured the same basic way as a 4-lug or 6-lug pattern. Because the lug holes are evenly spaced, finding the correct measurement is usually straightforward.
Step 1: Locate Directly Opposite Holes
Find two lug holes that sit directly across from each other on the wheel. These will be your measurement points.
Step 2: Measure Center-to-Center
Measure from the center of one lug hole straight across to the center of the opposite lug hole.
For the best accuracy, keep the measuring tool as straight as possible. A caliper works well, but a tape measure can also get the job done.
Step 3: Determine the Bolt Circle Diameter
The distance you measured is the bolt circle diameter. Write down the measurement in millimeters.
For example, if the measurement is 170 mm, the bolt pattern is:
8×170
The “8” indicates the number of lug holes, while “170” is the diameter of the bolt circle.
Because 8-lug wheels are commonly used on heavy-duty trucks, accuracy is important. Taking a second measurement to confirm your result is a good idea before ordering replacement or aftermarket wheels.
How to Read Wheel Bolt Pattern Numbers
A wheel bolt pattern usually looks like 5×114.3 or 6×135. The first number tells you how many lug holes the wheel has. The second number tells you the size of the bolt circle in millimeters.
For example, 5×114.3 means the wheel has 5 lug holes and the holes sit on a 114.3 mm bolt circle.
6×135 means 6 lug holes and a 135 mm bolt circle.
5×127 means 5 lug holes and a 127 mm bolt circle.
Once you understand the format, the number is easy to read. The main thing to remember is that the first number is the count of holes, and the second number is the measurement size.
| Bolt Pattern | What It Means |
| 5×114.3 | 5 lug holes, 114.3 mm bolt circle |
| 6×135 | 6 lug holes, 135 mm bolt circle |
| 5×127 | 5 lug holes, 127 mm bolt circle |
A small but important detail: bolt pattern only tells part of the story. Even if the numbers match, the wheel still needs to fit the vehicle correctly.
Metric vs Inch Bolt Pattern Measurements
Wheel bolt patterns can be listed in either metric or inch measurements. This can confuse people, especially when they see two numbers that seem close but are not exactly the same.
For example:
- 114.3 mm is equal to 4.5 inches
- 127 mm is equal to 5 inches
- 139.7 mm is equal to 5.5 inches
That means a wheel listed as 5×114.3 may also be described in another format depending on the source. The important thing is to know what system is being used before you compare wheels.
A common mistake is assuming two sizes are identical just because they look close. In wheel fitment, close is not always good enough. Use the exact measurement whenever possible.
Common Mistakes to Avoid
Most wheel measurement problems happen because of small, simple mistakes. The issue is that even a tiny error can lead to buying wheels that don’t fit at all.
- Measuring from edge to edge instead of the center
This is the most common mistake. Always measure from the center of one hole to the correct point on the other. - Using the wrong method for 5-lug wheels
5-lug wheels don’t have a direct opposite hole, so the measuring method is different. If you treat it like a 4-lug wheel, your result will be wrong. - Mixing up millimeters and inches
Both units are used in wheel sizes. If you switch them by mistake, the number will look close but won’t match. - Thinking close numbers are the same
For example, 114.3 and 115 may seem almost equal, but they are not interchangeable. Small differences matter a lot in wheel fitment. - Rushing the measurement
Quick guesses often lead to wrong results. Taking an extra minute to measure carefully can save you from buying the wrong wheels.
Even a small mistake here can make a wheel completely unusable for your vehicle, so it’s worth double-checking before you move on.
Bolt Pattern Is NOT Enough (Important Fitment Warning)
Even if the bolt pattern matches your vehicle, that does not guarantee the wheel will fit properly. Many people stop here and later face problems during installation.
There are a few other things you must check before buying wheels.
- Center bore: This is the hole in the middle of the wheel. It needs to sit properly on your vehicle’s hub. If it’s too small, the wheel won’t go on. If it’s too large, it may not sit centered.
- Offset: Offset tells you how far the wheel sits inward or outward. Even a small change can make the wheel rub the suspension or stick out too far.
- Wheel width: This affects what size tire you can use. A wheel that is too wide or too narrow can cause fitting or safety issues with the tire.
- Brake clearance: Some wheels fit the bolt pattern but still touch the brake calipers. This is more common with larger brakes or aftermarket setups.
The key point is simple: a bolt pattern only means the wheel can attach to your car. It does not mean everything else will work correctly.
Always check full fitment before buying, not just the bolt pattern.
Bolt Pattern vs Wheel Offset vs Center Bore
Bolt pattern, offset, and center bore are three different things, and they all matter.
The bolt pattern tells you whether the wheel will attach to the vehicle hub. The offset tells you how far the wheel sits in or out from the hub mounting surface. The center bore is the size of the hole in the middle of the wheel that fits over the hub.
You can think of it like this:
- Bolt pattern = how the wheel mounts
- Offset = where the wheel sits
- Center bore = how the wheel centers
A wheel can have the correct bolt pattern but still not fit well if the offset is wrong or the center bore does not match. That is why bolt pattern alone is not enough.
For example, a wheel might bolt onto your vehicle but stick out too far, rub the suspension, or interfere with the brakes. So always check the full fitment picture.
How to Confirm You Have the Right Fitment
Before you buy any wheels, take a moment to double-check a few important things. This is the step that helps you avoid most fitting problems.
First, make sure the bolt pattern matches your vehicle exactly. Even a small difference means the wheel will not mount correctly.
Next, check the center bore. The wheel should sit properly on the hub without forcing it or leaving too much gap. This helps the wheel stay centered.
Then look at the offset. It should keep the wheel in a safe position so it does not stick out too far or sit too far inside the wheel well.
Also, make sure there is enough space around the brakes and suspension. Some wheels fit on paper but still touch parts of the vehicle when installed.
If all of these checks match, the wheel will usually fit without issues.
Frequently Asked Questions
Can I measure the bolt pattern without removing the wheel?
In many cases, yes. If the holes are visible enough, you can measure the bolt pattern while the wheel is on the vehicle. Just make sure you can see the lug holes clearly.
How accurate does the measurement need to be?
Very accurate. A small measurement mistake can lead to buying the wrong wheels, so take your time and measure carefully.
Can wheel spacers change the bolt pattern?
No. Wheel spacers change how far a wheel sits out from the hub, but they do not change the bolt pattern.
Final Thoughts
Learning how to measure wheel bolt patterns is one of the most useful skills you can have when buying or replacing wheels. It helps you avoid expensive mistakes and gives you a much better chance of getting the right fit the first time.
The most important thing to remember is that the bolt pattern is only one part of the wheel fitment. You also need to check offset, center bore, wheel width, brake clearance, load rating, and lug nut seat type.
If you take the time to measure carefully and verify the full fitment, you can shop with confidence and avoid a lot of frustration later. A few minutes of checking now is far easier than dealing with the wrong wheels after they arrive.